
Environment
I firmly believe that one of the most important things in creating a portrait is the environment in which the portrait is created. I define environment as the immediate close surroundings affecting the image. Careful consideration must be given to matching the desired result to the environment. So for the type of portraiture that I do I need a relaxed somewhat homelike area. I use a living room to do most of my shooting. I have a couple of couches, a table, a straight chair, an easy chair, and a lowboy bench.
Other photographers that I know use totally different setups. Each must create that which will best enhance the individual style. There is no “end all be all.”
Relax customer
When I first meet with the customer comes I greet them and try to help them relax. I usually have them sit in one of the chairs or on the couch while I explain what I am going to do. Many times I will ask them to close their eyes and breathe in and out slowly a few times. I never rush!!! If the customer is in too much of a hurry I will sometimes suggest that perhaps it would be better if we re-scheduled when they are under less pressure. Most of the time this will get them to slow down and we can proceed. It is better to lose a shoot than to rush and mess it up. This approach may not work for everybody but it does for me.
Study face
When the subject has relaxed I then tell them that I need to study their face for a few minutes. I then study their face as to body type, bone structure, blemishes, and particularly to the eye structure. The way the eyes are treated is of paramount importance.
Different poses
Pose subject
Placing the subject in a viable position requires thought. I use, among other things, chair, couch, stool, wall, window, and floor. I first decide if I am going to create a full, half, torso, or head shot. Then I have the subject assume several position using the props I selected.. Sometimes I will snapshoot these for reference. After I have carefully selected the poses I am going to use I position the subject in the first pose.
Decide on lighting
For the most part I specialize in single light lighting. That is purely a matter of choice. I have used multiple lighting but for the drama I specialize in I prefer a single light placed strategically placed. I generally use a from shoulder up light for female and a shoulder down for male. This will vary according to circumstance.
Make the image
Now I set the ISO no. Then I take a reading with my Luna pro SBC meter. I use this meter because it gives me offsets to adjust for my Sunpak 365 flash. Now I set the aperture and shutter speed. I now release the shutter and create the image.
Move from CF card to raw folder
Next I move the images from the CF card to a folder labeled raw. From this folder I am able to make my primary adjustments using Digital Photo Professional (DPP).
Open and edit in DPP
Save to a folder labeled DPP
From DPP folder, convert and save to JPG folder.
I always keep the RAW and DPP folders so that if I goof I am able to go back and recover my work.
(As point of reference I use photoshop- 7)
Open JPG folder
First I crop the image and save it.
Extract image
I erase everything in the background that is unnecessary to the portrait that I am creating and save
Edit:
This is by far the most time consuming part of the process.
Skin
Using various tools such as dodge, burn, sponge, levels, color balance, hue and saturation, to name a few, I massage the skin into the way I want it to look.
Eyes
Magnify the eye area to about 200%
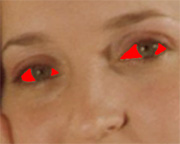
Click on the mask function.
Then go up the tool bar and click on pencil.
Fom the tool bar accross tho top choose: mode=normal opacity=100% brush size about 3 to 5.
Carefully outline the whites then fill with red color (white part only)
Exit quick mask
When you exit quick mask you will seea series of dashes around the masked area.
Go up the top tool bar click on select and choose inverse.
Go to image – adjustments – Hue saturation – reds: -48
Yellows: -34
Master - lightness: +10
Marquee tool and delete
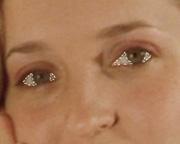
Iris and catchlight.
First: from the verticle toolbar select the dodge tool. Then go up to the horizontal tool bar. Choose brush the hard round. Size the brush to fit the color stripe onthe iris. Then go to range = highlights. Exposure = I usually find that about 50% is about right. Now make one pass only around the color stripe. Then chnge the exposure to 100% , Sizethe brush to fit the catchlight and make one click on each catchlight.
Marquee tool and delete
Teeth
Mask
100%
Cover teeth
Exit quick mask
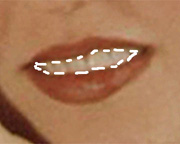
Image – adjustments – Hue saturation – reds -48
Yellows -34
Master - lightness -10
Marquee tool and delete
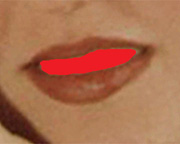
Lips
Mask
100%
Cover lips
Exit quick mask
Select inverse
Image – adjustments – levels or hue-saturation to taste
Hair
Dodge – highlights – 30% - airbrush soft round
Sponge – saturate – 30% - airbrush soft round

